|
|
|
#1
IP: 38.118.55.125
 02-21-2010, 06:53 AM
|
||||
|
||||
|
By way of background, the original late model factory solution was to use double-action thermostats which start to open and allow some coolant through the block and head as engine temperature moves past 140 degrees, and they then close off the bypass port in the thermostat housing when the engine temperature reaches 180 degrees. In standard late model bypass systems, engine temperature is free to vary between 140 and 180 degrees, depending primarily on the condition of the cooling jackets, temperature of raw water, and the load imposed on the engine.
Double-action O.E.M. thermostats have become very expensive, and (although still listed in our online catalog) are becoming problematic to keep in stock. We eventually joined others several years ago in offering an aftermarket thermostat that functioned like the O.E.M unit until the source of those thermostats disappeared in the past several months as well. At that time we concluded that the most cost effective and reliable solution was to incorporate a single-action thermostat into our kits, using a separate method of regulating the bypass loop. The separate method of providing a bypass restriction for single-action thermostats (to finally answer your question) is because they have no ability to regulate the bypass loop as temperature increases past 180 degrees. On our test stand, a spring loaded check valve providing 2 to 3 psi backpressure maintained normal temperature in a raw water cooled configuration using the single-action thermostat provided in our kits (CSTH_01_510). In freshwater cooled engines its frequently necessary to fully close the bypass loop when operating at high power settings in warm climates so a manual ball valve is recommended in those cases as well. In an effort to cover both applications, we currently provide a spring loaded check valve and a small manual ball valve in our by-pass restriction kits (product number CSOT_01_61). It should be noted that the need to provide a restriction of some kind in the bypass loop is not limited to the single-action concept. Universal themselves realized that unless their bypass type system had a restriction in the bypass loop, many engines would operate hotter than desired. In a technical bulletin from the mid-seventies, they recommended that the 90 degree elbow in the inlet to the thermostat housing be filled with lead and then re-opened by drilling an 1/8 hole in the lead. That technical bulletin was largely ignored in favor of more practical solutions and many Atomic 4s today are already equipped with either a manual ball valve or a spring loaded check valve in the bypass loop. Don 
|
|
#2
IP: 24.61.3.16
05-30-2011, 09:30 PM
|
|||
|
|||
|
Bypass retriction
I switched over to FWC about 3 seasons ago. I have removed the thermostat from the engine thinking it would run cooler. After getting and reading my new maint. manual I bought from Don, I have come to realize my actions are what caused my higher operating temps, especially at higher throttle.I will be reinstalling the themo as well as a restriction for the bypass(which I also removed).
OK here is my question. How much hose can I add the the system without adverse affects on the pump? I would like to mount the valve to restrict the bypass so that I can regulate it from the cockpit.Prob.about 5 feet of hose total. Thanks, Mike
|
|
#3
IP: 173.166.26.245
05-30-2011, 11:39 PM
|
||||
|
||||
|
The problem is not in the length of the hose but in the vertical rise. It will be difficult to keep such a line purged (or burped). Why not look into a valve you can mount low near the engine but operate from the cockpit? http://www.stcvalve.com/Process_Valves.htm#43
|
|
#4
IP: 76.217.56.241
10-26-2011, 08:48 PM
|
||||
|
||||
|
Thermostat, Holley Mfg. Co., 9A6 140
This is really confusing. I see several thermostats. Which one would replace the one with the above identifaction numbers and letters? My current one worked, but it's really corroded and I'd like to replace, update, or whatever it takes to have good operation.
|
|
#5
IP: 24.152.131.155
10-27-2011, 09:47 AM
|
||||
|
||||
|
Assuming you have the original Holley 3 spring thermostat in a late model head MMI's replacements are this one or this one. The second link has a new housing if yours needs replacement.
Back to your original thermostat. The Holley 3 spring has been referred to as the Holy grail of thermostats. Why not remove it, give it an overnight vinegar soak, perform a stove top test with a meat thermometer and reinstall it? If the metal is still intact and it's functioning properly your stat is as good as it gets.
__________________
Neil 1977 Catalina 30 San Pedro, California prior boats 1987 Westsail 32, 1970 Catalina 22 Had my hands in a few others
|
|
#7
IP: 76.217.56.241
10-29-2011, 09:52 AM
|
||||
|
||||
|
Quote:

|
|
#8
IP: 132.246.194.14
08-20-2014, 02:27 PM
|
||||
|
||||
|
When did single action thermostat kits start being sold?
I'm having overheating problems with my FWC engine. They are drastically reduced when I clamp off the bypass, which makes me suspect the thermostat. Since the original double-action thermostats are expensive, I was contemplating the use of Don's Thermostat conversion kit: CSTH_01_512.
However it looks like the 1/4" spacer has already been installed on my engine, but by adding longer studs rather than modifiying the thermostat housing. 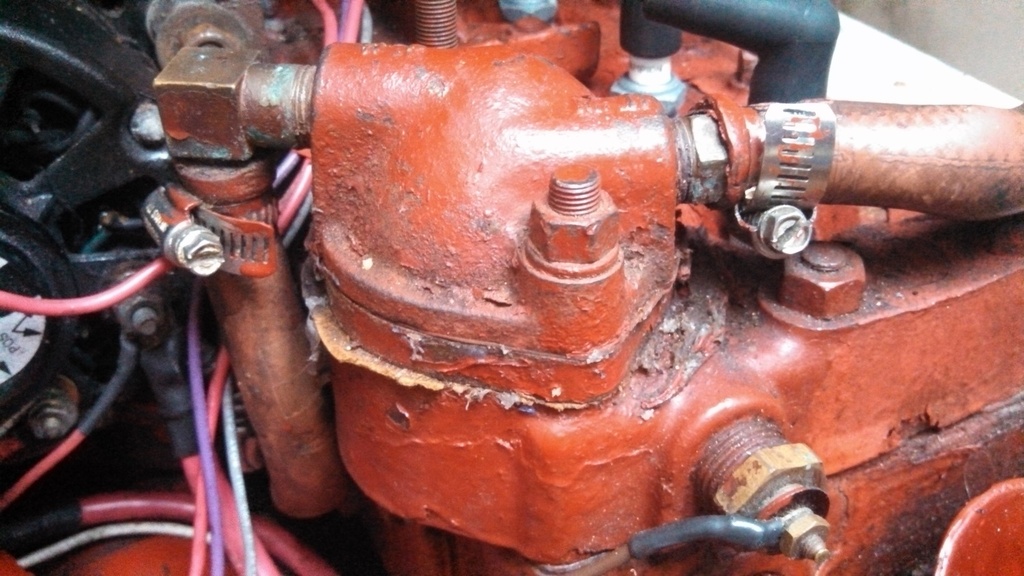 I bought my boat in 2003. When did the did the single action thermostat kits start being sold? Did anybody else sell something like it? Last edited by StephenGwyn; 08-20-2014 at 02:30 PM.
|
|
08-20-2014, 03:47 PM
|
| BunnyPlanet169 |
|
This message has been deleted by BunnyPlanet169.
|
|
#10
IP: 161.213.49.150
08-21-2014, 11:06 AM
|
|||
|
|||
|
Quote:
MMI sells a handy dandy "kit" that consists of a restrictor and a ball valve for the bypass hose. Betcha this would solve your overheating problem in a flash. BTW #1: How long has it been since the last acid flush? BTW #2: The hose clamps are way too tight. The clamps should leave only a slight impression on the hose. If it doesn't seal with this amount of pressure there is something wrong with the hose and\or the barb. TRUE GRIT Last edited by JOHN COOKSON; 08-21-2014 at 05:45 PM.
|
|
#11
IP: 132.246.194.14
08-21-2014, 12:53 PM
|
||||
|
||||
|
Install manual valve, replace hoses, install check valve, do acid flush, I plan to do all of those things.
However I'm also planning to take the thermostat apart, but before I do I'd like to know how long it's going to take to put put it back together. If it's the original style thermostat, it's 150$ for a replacement, or slightly cheaper to add 1/4" spacer and a new style thermostat. And while I don't mind giving money to MMI, I live in Canada and UPS charges a hefty customs brokerage fee, even though marine engine parts made in the US are duty free under NAFTA. Love MMI, hate UPS. Also, it means the engine is out of action for at least a week while I wait for parts. But if it already has the 1/4" spacer, it might already have a single action thermstat available locally.
|
|
#12
IP: 24.152.131.153
08-21-2014, 01:13 PM
|
||||
|
||||
|
I think what John is saying is many of us opt to run without a thermostat using the bypass valve to control the temp instead. It's a personal choice.
__________________
Neil 1977 Catalina 30 San Pedro, California prior boats 1987 Westsail 32, 1970 Catalina 22 Had my hands in a few others
|
|
#13
IP: 198.11.8.218
08-21-2014, 01:36 PM
|
||||
|
||||
|
Guessing (only) from your picture, there is no good reason for that extra part to be there except to accommodate the aftermarket thermostat. MMI offers a kit which also replaces the studs. Looks like that's what you have.
http://www.moyermarine.com/cgi-bin/s...=CSTH_03.4_241 It's only minutes to remove. A few more to scrape old gaskets. A few more to replace old hoses that won't come cleanly off fittings.... You'll want two new gaskets to replace.
__________________
Jeff  S/V Bunny Planet 1971 Bristol 29 #169
|
|
#14
IP: 96.76.48.110
02-12-2022, 01:56 PM
|
|||
|
|||
|
Soot in thermostat
Hello guys,
Joined the forum to learn how to maintain properly my Atomic 4 which I have on Coronado 30. I'm new to the engines so please don't throw stones in my direction  I have few issues with my A4 among others is milky oil/moisture in first two cylinders. I have few issues with my A4 among others is milky oil/moisture in first two cylinders. I'm trying to understand how would the soot/grime get into the thermostat per pics attached. Could it be the manifold has a crack sipping water in mixed with exhaust gas when operating? The engine is raw sea water cooled. Any thoughts or ideas?
|
|
#15
IP: 69.251.78.78
02-12-2022, 07:14 PM
|
|||
|
|||
|
Quote:
I recommend you start a new thread on this issue.
|
| The Following User Says Thank You to scratchee For This Useful Post: | ||
sastanley (02-12-2022) | ||
|
#16
IP: 69.250.111.245
02-12-2022, 08:17 PM
|
||||
|
||||
|
Jr.
Plus One...start a new thread on your particular issue so we can keep it all isolated to you! And, welcome aboard.
__________________
-Shawn "Holiday" - '89 Alura 35 #109 "Twice Around" - '77 C-30, #511 with original A-4 & MMI manifold - SOLD! (no longer a two boat owner!!) 
|
|
#17
IP: 96.76.48.110
02-15-2022, 01:20 PM
|
|||
|
|||
|
Quote:
|
| The Following User Says Thank You to JuniorAtomic For This Useful Post: | ||
sastanley (02-16-2022) | ||
|
#18
IP: 96.76.48.110
02-15-2022, 01:19 PM
|
|||
|
|||
|
Quote:
The moisture in 1,2 cyl is an ongoing issue that was fixed temporarily couple years ago by a local mechanic and now looks like it's back and I have some ideas on what is causing this which I will share in relevant Discussion Topics threads
|
|
#19
IP: 199.119.235.167
04-22-2023, 02:19 PM
|
|||
|
|||
|
installing MMI Thermostat, 150 degree (late model double-acting)
a hint for the community on installing a MMI Thermostat, 150 degree (late model double-acting). What appears to be a simple job becomes more complicated when having to remove the alternator to get at the hoses for the bypass valve and remove them to take the thermostat housing off. It took me 3 tries to get the new thermostat centered in the head so that the housing wouldn't leak. What worked for me on the third try was glueing the thermostat to the flange inside the housing with a tiny amount of Permatex seal-a-gasket, and clamping it overnight. On this attempt when I turned the housing with the thermostat attached, I was able to center it in the head so that it no longer leaks. I can think of no other way to center it without trial and error, because the 'hole in the head' (no pun intended) is larger than the diameter of the thermostat. The flange of the thermostat just fits in the lip of the housing, so glueing it in there just makes sense. It would be great if Ken could supply a tiny amount of Permatex seal a gasket for just this purpose.
I used the aviation Permatex for the gasket itself and even put a thin layer on top of the gasket (just to be sure) even though it's not recommended. With having to take the alternator and short hoses apart the whole process is very time consuming and frustrating if the housing leaks after putting it all back together again which is the only way to test the seal. You simply can't tell if the thermostat is centered until you start the motor. Ken doesn't like the idea of using Permatex on the top of the gasket and the housing lip because of difficult cleaning at maintenance time. Personally I'd rather apply a little elbow grease to cleaning than having to re-install the thermostat and housing. Just my thoughts in case anyone else comes up against this issue.
|
| The Following User Says Thank You to Captain Kirk For This Useful Post: | ||
TimBSmith (04-23-2023) | ||
|
#20
IP: 24.184.45.46
04-24-2023, 12:44 PM
|
||||
|
||||
|
Does MMI Thermostat eliminate need for bypass back pressure?
I am installing the MMI thermostat and Moyer's comments make me think it eliminates the need for any restriction in the by-pass loop. "This design also eliminates the need for any additional restriction in the by-pass loop." Which makes sense as the thermostat when fully open will close off the bypass. (My thermostat housing is in good shape.)
I assume that means I can remove the "Check Valve" with the 2-3 PSI back pressure installed in the bypass loop. I don't see that it does any harm to leave it in place, but it does make removing the thermostat when winterizing or doing an acid flush a bit of a PITA. Or does it mean any restriction in addition to the Check Valve?
|
 |
|
|
 Similar Threads
|
||||
| Thread | Thread Starter | Forum | Replies | Last Post |
| Some Comments About Coils | Don Moyer | Ignition System | 42 | 10-17-2017 05:03 PM |
| Thermostats | levins | Cooling System | 1 | 08-29-2008 05:28 AM |


 Hybrid Mode
