Hull to deck flange...what to do when it's broken and leaking water?

Collapse
X
 
  • Filter
  • Time
  • Show
Clear All
new posts
  • rockhopper
    Senior Member
    • May 2017
    • 81

    #16
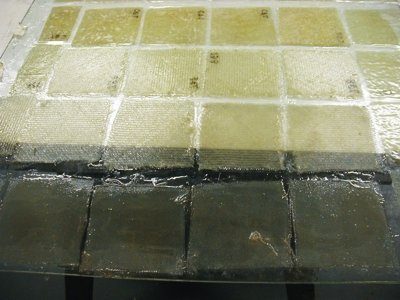
    Oh, so the wooden piece is not from Pearson? I was under the impression that it had been placed in between the hull and deck from factory. Did Pearson fiberglass the hull and deck together on the inside or is that something a previous owner did?

    Do you have any idea how much/long a repair would take/cost? Never done fiberglass work but will need to learn it.

    Thanks again for all of the helpful information.
    Chris
    1973 Pearson 30 #411
    Trinity, North Carolina

    Comment

    • tac
      Senior Member
      • Nov 2015
      • 209

      #17
      One Step Hull/Deck Join Repair

      1. Make two pieces of wood to act as forms. Each piece will be a foot or so longer than the repair. Thin wood that is supple is best, because it will have to follow the curve of the hull. Pine 1x3 strapping or white cedar 1x3 will work.
      2. The wooden piece to act as the form for the deck flange should have one corner rounded over to mate against the outboard edge of the toe rail. A router with a round-over bit (3/8"??) will do a smooth, fast job.
      3. The wooden piece to act as the form for the hull flange should have one corner rounded over (1/8"???) to mate against the inboard edge of the hull.
      4. Both pieces should be at least 1-1/2" wide.
      5. Wax what will be the inboard sides of these forms. Mark the outsides to remind you what's what.
      6. Thoroughly clean the area to be repaired, and a foot or so beyond, with dewaxer.
      7. Leave the good flanges tightly bolted/clamped together. Grind a bevel of at least 10:1 into the joined hull/deck pieces in the ends of the broken sections, into the good sections.
      8. Sand all exposed surfaces with 80 grit.
      9. Clamp the hull form to the forward end of the good part of the hull flange. Depending on the curvature, you may need two clamps.
      10. Bend the hull form to fit against the aft good hull flange and clamp in place.
      11. Proceed as in the Hull Flange Repair above, starting at step 4 and continuing up through step 8.
      12. Now continue laying up more fiberglass until you are near the finished deck flange top.
      13. Lay the deck flange form on top of the new glass layers as needed.
      14. When you've reached the final layer, clamp the two forms lightly together to maintain about 3/8" thickness, and let it cure. That's not critical, since the plastic insert is 1/4". This allows 1/8" slop.
      15. When cured, knock off the forms and grind to taste. Paint.

      Remember: most of your work won't show since the insert and rubrail will cover it. This makes a good project to do, no one will see the rough work.

      Comment

      • tac
        Senior Member
        • Nov 2015
        • 209

        #18
        I doubt Pearson used wood and fiberglassed the inside. If they did, it would have been the whole length, both sides, not just in the bad area.

        You've never done fiberglass repair. Then you MUST get a copy (and read and reread it many times) of Don Casey's book, or any other suitable book. For any of the methods described here you can try some simple layups at home, in the privacy and confines of your own basement.

        To do any of the three (or is it four?) repairs above should take about a day, IF you've read up and practiced a bit.

        Cost:
        West System 105 resin, quart:
        West System® 105 Epoxy Resin®. A clear, low-viscosity liquid epoxy resin. Designed to wet out and bond to wood, fiberglass, reinforcing fabrics, composites and a variety of metals. Formulated for use with one of four West System® hardeners. With roller applications, it has excellent thin film characteristics, allowing it to flow out and self-level without "fish-eyeing.


        West System 206 hardener, pint:
        West System® 206 Slow Hardener®. A low-viscosity epoxy curing agent formulated for general coating and bonding applications. For use when extended working time or a longer cure time is needed. Provides adequate working time at higher shop temperatures. Formulated for use with West System® 105 Epoxy Resin®. Forms a rigid, high-strength, moisture-resistant solid bond


        Mixing cups:


        Fiberglass cloth:


        Acetone for cleanup:
        Hardware store $10/qt

        Nitrile gloves:
        Hardware store $13/box 100

        Dust mask, N95:
        Hardware store $10 box of 10

        Dewaxer:
        Marine supply or hardware store $15-25/qt

        All the above should be off the shelf at any marine supply.

        Those are the major things. Incidentals (sandpaper, grinding wheels) will probably add another $10-30. Or not. Keeping things in perspective, you'd pay someone $$$$ for 4-8 hours of work (the going rate around here, I think, is $80/hr, material extra). And the experience you gain will come in handy.

        Comment

        • tac
          Senior Member
          • Nov 2015
          • 209

          #19
          Fiberglassing References

          Don Casey's book, Sailboat Hull & Deck Repair, https://www.amazon.com/Don-Casey/e/B...3484882&sr=8-1
          Good reading with a lot of good drawings. The early additions mostly dealt with repairs using polyester. The latest may deal more with epoxy.

          And the following, all free, from probably the First Name in epoxy, West System (NO relation to West Marine):

          West System - Gougeon Brothers On Boat Construction
          Download a free PDF of the Gougeon Brothers On Boat Construction book in its entirety, or order it from Amazon.com.


          Another excellent guide, especially for your repairs:


          West Systems has a periodic magazine called Epoxy Works, that's also on-line. A subscription in the mail is free. On-line:
          Building, Restoration & Repair with Epoxy
          Last edited by tac; 08-23-2017, 06:49 AM. Reason: Fixed broken links

          Comment

          • edwardc
            Afourian MVP
            • Aug 2009
            • 2491

            #20
            Tac,

            Your first two links appear to be broken. The "..." elipisis got carried over into the link instead of the complete link.

            The third one is complete and works.
            @(^.^)@ Ed
            1977 Pearson P-323 "Dolce Vita"
            with rebuilt Atomic-4

            sigpic

            Comment

            • romantic comedy
              Afourian MVP
              • May 2007
              • 1912

              #21
              I have bought West System from Boatersland this past winter/spring/summer, about 6 gallons.

              Resin was 67 a "gallon"
              Hardener was 37 a "quart"


              FWIW, cheapest I could find

              Comment

              • tac
                Senior Member
                • Nov 2015
                • 209

                #22
                Thanks, Ed. All fixed now

                Comment

                • rockhopper
                  Senior Member
                  • May 2017
                  • 81

                  #23
                  Hull deformation

                  Just got back home with a few more pictures and information. I'm almost positive the hull is deformed but I could be wrong, not sure if it really matters. I am able to press in on the hull and some what see it move inwards.

                  1. In the first picture you can see the flange is still there and the hull is lined up with the edge of the flange.
                  2. Picture 2 is looking up from the hull to the flange.
                  3. Picture 3 is in the port aft inside the boat looking up. The top edge of the wood I believe is where the inside of the hull is supposed to line up.
                  4. Picture 4 I pulled the pvc channel back on an unbroken section just before the broke section and you can actually see where the hull flange is no longer flush with the deck flange.
                  Attached Files
                  Chris
                  1973 Pearson 30 #411
                  Trinity, North Carolina

                  Comment

                  • ndutton
                    Afourian MVP
                    • May 2009
                    • 9601

                    #24
                    Although I've been watching, I've laid off this thread because you've received excellent advice all along, particularly the links in post #19. Most of what I might contribute would repeat what has already been provided. I'd like to add a few notes though:
                    1. This is a structural repair not only for hull/deck integrity but also for stresses imposed by the track in the immediate vicinity.
                    2. The repair should be done on the inside of the boat. Restoration of the external flange is to give the joint trim something to mount to, little else.
                    3. Forget flange alignment as an indication of hull deflection. Instead, sight the hull from all possible angles from the outside looking for a 'fair' curvature free from hard spots (like something pushing from the inside) or flat areas. Wet the hull if necessary to see a good reflection off the hull.
                    4. Remove all fasteners from the repair area and beyond for a generous distance including those two thru bolts seen in the pictures. They're in the way, can be reinstalled later.
                    5. Grind the inside of the hull and deck so you have a repair area free from paint, bumps, spikes and protrusions of any kind. You want clean smooth fiberglass for the repair area. The attempted fiberglass repair in the third picture you provided this evening (post #23) has to go, all of it.
                    6. If hull deflection is observed, deal with it now. Push the hull in with external supports or out with spreaders across the hull on the inside. Don't overdo it and add deflections of your own.
                    7. Make a generous fillet with thickened resin on the inside along the hull and deck joint and beyond. This is a critical structural step. Fiberglass does not conform well and its strength is greatly reduced by hard angles. I recommend at least a 3/4" radius for the fillet. The thickened material should be the consistency of soft clay before it cures and you may have to build it up with a few applications. Fillets are covered in the WEST Systems links in post #19.
                    8. Place the fiberglass bonds from hull to deck. Make the bonds out of 2 layers of 3 oz. mat and one of 7 oz. cloth (or similar, cloth on the outside), each bond 6" wide x 9" long. Anything bigger and they'll be difficult to handle and tend to fall away from the deck. Work the air and excess resin out of the bonds with your fingers to make a smooth, fair finished product like the third picture in post #10.
                    9. After the bonds cure, do it again and again, building up three laminations.
                    Neil
                    1977 Catalina 30
                    San Pedro, California
                    prior boats 1987 Westsail 32, 1970 Catalina 22
                    Had my hands in a few others

                    Comment

                    • tac
                      Senior Member
                      • Nov 2015
                      • 209

                      #25
                      The best advice is always from the pros.

                      Keep in mind that epoxy by itself, or with fillers, has little inherent strength, and is quite brittle. Woven fiberglass cloth (or mat) by itself has little strength, and is very floppy. But when you properly saturate cloth or mat with epoxy, after it cures you have a remarkably strong material. Thus the fillet Neil recommends will not be strong unless backed by cloth, as he describes.

                      With regards to the use of mat with epoxy, you may see statements that epoxy will not "stick" to mat, that in order to hold the mat strands together, a coating is added which is compatible with polyester resin, but not always with epoxy. West System has tested mat and epoxy and concludes that they are compatible:

                      by Tom Pawlak — GBI Technical Advisor Above: Wet-out chopped strand mat and woven fabric test samples are prepared for moisture uptake testing. Chopped strand mat, in fabric form, is sold on the roll and in small folded packages. It is made up of 1″-2″ long fiberglass strands that are randomly oriented and typically held […]

                      Comment

                      • ndutton
                        Afourian MVP
                        • May 2009
                        • 9601

                        #26
                        Correct, all the fillet does is hold the fiberglass in a high strength shape until it cures and provides a solid substrate to work the air out. It makes a significant difference.
                        Neil
                        1977 Catalina 30
                        San Pedro, California
                        prior boats 1987 Westsail 32, 1970 Catalina 22
                        Had my hands in a few others

                        Comment

                        • rockhopper
                          Senior Member
                          • May 2017
                          • 81

                          #27
                          Sorry, been so busy with life I hadn't got back. After going to my boat last weekend and looking it over I don't believe there is any hull deflection. It appears the hull has the same curvature and isn't deflected that I can tell.
                          Chris
                          1973 Pearson 30 #411
                          Trinity, North Carolina

                          Comment

                          • ndutton
                            Afourian MVP
                            • May 2009
                            • 9601

                            #28
                            Technique for wetting out bonds

                            I don't recall if this was covered in the links but a technique for wetting out bonds before application that has worked well for me over many years is to prepare them on a batter board. A piece of cardboard or plywood will do.
                            • Pre cut the bonds, cloth slightly larger than the mat.
                            • With a 4" throw-away brush, wet an area on the batter board sufficient for the bond size.
                            • Lay down the cloth on the wetted area (we are building the bond upside down) and apply more resin.
                            • Lay the first mat over the cloth and wet it out using a blotting rather than stroking brush motion.
                            • Do again with the second mat layer.
                            • Lift the bond from the batter board (you'll find the cloth holds everything together nicely) and apply to the hull/deck area, work the air and excess resin out of the bond to a smooth finish. You want to work out as much resin as possible for a high glass to resin finished ratio.
                            • It really helps to have one person wetting out the bonds while the other applies them.
                            Neil
                            1977 Catalina 30
                            San Pedro, California
                            prior boats 1987 Westsail 32, 1970 Catalina 22
                            Had my hands in a few others

                            Comment

                            Working...
                            X