|
#1
IP: 74.110.89.228
 04-04-2010, 01:37 AM
|
||||
|
||||
|
A developing story
Moderators - Feel free to put this under whatever topic seems appropriate as it spans several. I'll use several posts to lay out the story.
I recently bought a 1977 Tartan 30. After a couple of months working on other projects I dove into the engine, an Atomic 4 of course! The previous owner died, so I had no history on the boat or engine. It was a positive indication though, that it looked reasonably clean and had the Indigo oil filter kit installed. Well, the first thing I did was purchase Don's manual. Then I did the usual tune up items (points, condenser, plugs, cap, rotor, filters). I cleaned the carburetor and took apart the raw water pump for inspection/service. After all this, it seemed to run pretty well and had no issues during a weekend trip with a total of about 6 hours running. Some notable findings were: Inoperable gauges, no thermostat in the housing, but a bypass constricting valve had been installed, the carb was pretty dirty and much of the wiring looked questionable with only one fuse (to fuel pump). So here is where the trouble starts. I went for an afternoon sail. The engine ran fine getting us out of the marina, at which point the sails went up and we sailed in light to medium breeze for a hour or so. Absolutely nothing out of the ordinary. I went to start it up when the wind died and it had a pronounced loud tapping, and a significant reduction in power (about 50%). Some minor troubleshooting revealed cylinder one operating reliably, 2 and 3 intermittent, and 4 not firing at all. The oil was a little milky, but the level was not noticably higher. After a while I couldn't get it to start at all and the wind had picked up so we finished our sail. I tried to get it started again just before going back into the marina. No dice. I've only been sailing for 9 months, so it was with some trepidation that I decided to sail into the marina and into my slip. Well, as it turns out, this is not nearly as difficult as it might seem and (though there were some tense moments) it went off without a hitch. The next day I went back to the boat and did some more troubleshooting. I had good compression on all cylinders, good spark, and fuel in the throat of the carburetor, but still no starting. Don was very helpful on the phone and we determined that water had gotten into the cylinders from the exhaust and killed the plugs. I verified this by detaching the hot exhaust from the manifold and finding it wet in there. After extensive drying of the cylinders and following Don's direction, I finally got it to start up again, but it ran horribly, never did work on cylinder 1, and both 2 and 3 were intermittent. To be continued... Qben Oliver 1977 Tartan 30 
|
|
#2
IP: 74.110.89.228
04-04-2010, 02:19 AM
|
||||
|
||||
|
A developing story - Part 2
I had already determined that my exhaust system needed some modification (or repair if there was something clogged or damaged) since there was absolutely nothing out of the ordinary that might have caused the water intrusion. No cranking with the seacock open, no prolonged sailing in rough weather, excessive heeling or pitching, nothing. I went to pull the manifold because there was no other way to get the hot exhaust off that I could see (clearance issues). The two outside studs came out with the nut - good. The middle one broke off flush with the outside of the manifold with very little pressure - bad. Before I did too much prying and hammering (thankfully) I called Don back and he informed me that, due to the "Swiss cheese" configuration of the block where the manifold attaches, it is very easy to break a chunk of the block off with the manifold stud (heart skipped a beat there). Ok, here is one of the many, many times in the next few weeks that I congratulate myself for buying a boat with good access to the engine. Don said drill it out, so that's what I started to do. Well, let's just say that with a heavy drill and a little bit, it doesn't take a very big tweak of the angle for a small bit to snap off when it is 3/4" into the stud. Ok, a minor setback (having never done this before). I'm thinking I can just go get a cobalt of carbide tipped bit and continue drilling. Well, I'm here to tell you that drilling through a drill bit of any kind is not a good plan. Many hours later I had gone a millimeter at best and still estimated that there was over 1/2" of bit left in the stud. I changed tactics and went with a 2 pronged approach. I set about intermittently heating and cooling the stud and manifold around it while applying penetrating oil (Kroil) for 2 days. Not expecting this to work (as it turns out it didn't), I also went after the gasket with a metal putty knife (thankfully it was brittle). I was able to clear the whole gasket except for a small area around the frozen stud, which gave me clearance to get a reciprocating saw blade in there. There was actually more clearance than I expected there to be and the blade fit loosely in the slot. Then I found that the valve cover needed to be removed so the end of the saw blade wouldn't hit the top of it as I would be sawing vertically.
So here is the next evolution. The valve cover came off easily. Examination of the stuff in there revealed that the exhaust valve springs for cylinders 1, 2, and 3 were all broken. Not just broken, but mangled and not doing any springing at all. I'm thinking there has been a longstanding water intrusion problem, even if it has mostly just been steam getting in the manifold and condensing to run down through the exhaust valve guides. Hopefully, this explains why I couldn't get it running well after drying the cylinders. The first picture is of the broken #1 exhaust spring. When I pulled the springs, I found that the bottom loop of the #2 intake spring was also broken (third spring from the left), but it wasn't evident from inspection and appeared to still be mostly functional. The second picture is of the broken #2 and 3 exhaust valves. 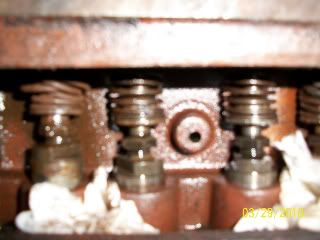 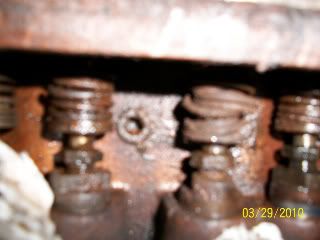 Well, back to what I was doing. I carefully advanced the reciprocating saw blade (the longest I could find) into the gap and to within 1/2" of the broken stud. Here, I took a deep breath and started cutting. This solution couldn't have worked better! I was through the stud in seconds and there was no damage at all to either mating surface! Over the next couple of days I spent several hours trying to clear the remaining piece of the stud from the manifold. Even after I drilled from the backside (MUCH more carefully this time) and completely cleared the hole, up to the end of the broken bit, no amount of penetrating oil and pounding with a punch would loosen it. There was less than 3/4" of stud remaining at this point and I couldn't believe that it was so frozen in there. Eventually, I was able to drill through the remaining piece beside the broken bit and relieve enough tension to punch the rest of the bit out. I was then able to clear the hole by drilling out the rest of the stud. All told, it took me about 10 hours to recover from a broken drill bit, but if I hadn't cut the manifold off, I'd still be drilling. That's one lesson I'll never forget. Anytime I drill from an awkward position or if there is any doubt, I'll use a jig or something to keep me straight and true. That way even if it did break off, it would hopefully be where it exits the jig and I could just remove the jig and proceed to take the bit out with a pair of pliers. Here is a picture of the hot exhaust. The distance from the point where the water is actually injected into the hot pipe is only 2" below the manifold. 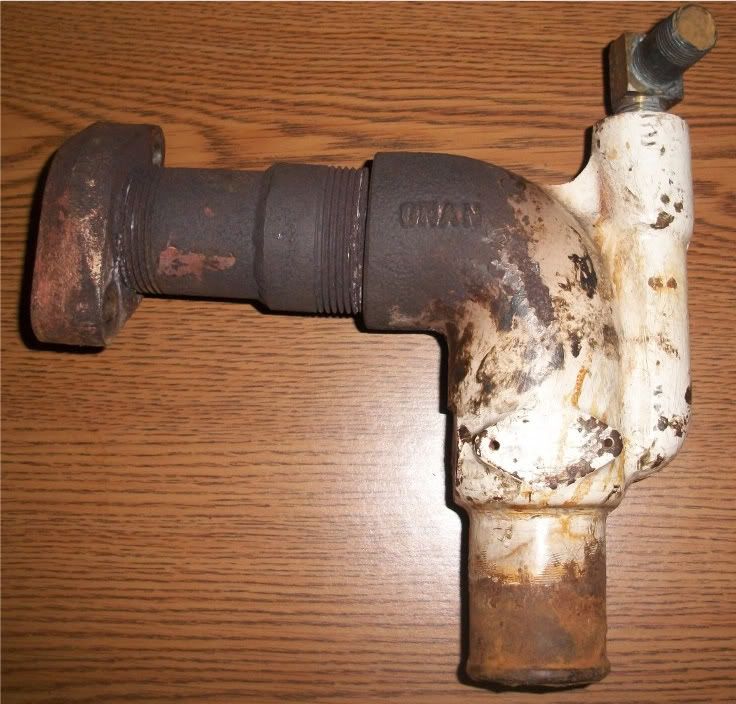 To be continued... Qben Oliver Last edited by Qben; 04-04-2010 at 03:17 AM. Reason: Trying to get the inserted picture to work
|
|
#3
IP: 142.68.246.69
04-04-2010, 06:54 AM
|
||||
|
||||
|
Two puzzlers for me so far:
1. Why did the engine run OK for 6 hours initially and then get into trouble next time? 2. Where is the water intrusion? I'm all ears - most interesting.
__________________
1974 C&C 27
|
|
#4
IP: 68.224.118.14
04-04-2010, 10:09 AM
|
||||
|
||||
|
Hmmm, sure looks like that water entrance point on your hot exhaust is the source of your problem...
I believe the recommended MINIMUM is to be at least 4" below. Some of us have even gone to the extremes of 12" or more. But, I guess you may already know that?
__________________
-Jerry 'Lone Ranger'  1978 RANGER 30
|
|
#5
IP: 74.110.89.228
04-04-2010, 12:04 PM
|
||||
|
||||
|
"1. Why did the engine run OK for 6 hours initially and then get into trouble next time?"
Rigspelt - That is the million dollar question. I have to chalk this up to a poor exhaust system design (not the original setup) which was causing my valve springs to slowly rust and weaken over time. I surmise that they finally gave out when I went to start the engine with water in the cylinders. The only reason I can think of for the water intrusion during the short period of benign sailing that occurred after shutting down is the anti-siphon valve failing to operate appropriately and filling the water-lift muffler enough to back up into the hot exhaust and maybe splash some water into the manifold on a tack or something. It wouldn't have taken much because the run to the muffler entrance was only about 10 inches and the exhaust enters it at the bottom (Vetus NLP. Here's a picture). http://www.jamestowndistributors.com...ocks+Type+NLP# It's kind of hard to explain, but that particular muffler has two chambers, one in the top half and the other in the bottom. They are isolated from each other except for a 1" diameter tube that goes vertically through the middle and terminates at both ends about a half inch from the top and bottom of the canister. The effect is that when the engine is shut down, any water left in the wet hose after the muffler drains back and is caught in the top half of the muffler, preventing it from getting to the bottom half where it could go up the manifold side of the exhaust and back to the engine. Sounds great right? Well not necessarily. The water on the exhaust side of the vented loop has to drain somewhere when the engine is shut off too. Since the muffler canister (0.84 Gallons in my case) is divided into two chambers, the effective size of the canister that can hold this water is cut in half. Physics tells us that (without exhaust pressure) the water would have to back up into the hot side of the exhaust higher than the level of the top of the tube between the halves of the muffler before water could spill into that top half. For my system, that leaves water backed up in the hot exhaust to some level at all times when the engine is off. Remember that this section was nearly vertical and only about 10-12 inches long. I hope I explained that ok. I'd be happy to expound if necessary. The bottom line is that the exhaust configuration was very vulnerable and I'm going to experiment with installing a simple insulated hot section to well above the waterline and inject the water after this riser to bypass the muffler and any chance of cooling water getting back to the engine for ever more. If it's too loud I'll probably just put a plastic inline muffler in before it exits the boat. I'll take pictures and keep everyone posted on my progress and results. Qben Oliver
|
|
#6
IP: 74.110.89.228
04-04-2010, 12:12 PM
|
||||
|
||||
|
Roadnsky - I didn't know initially about the 4 inch recommended minimum, but through much research I have learned it. I don't have the space to inject the water more than about 6" below the manifold and that puts it right up against the plastic muffler inlet. If I can't get my muffler bypass to work satisfactorily, I can add an exhaust riser on the other side of the bulkhead to get the vertical separation, but I'm concerned about the back pressure that an additional 30 inches and 315 degrees of turns would create. If I did this I would go to one and a half inch pipe for the 40% increase in interior volume.
Qben Oliver Last edited by Qben; 04-04-2010 at 12:14 PM. Reason: To make it more clear
|
|
#7
IP: 74.96.148.103
04-04-2010, 09:52 PM
|
|||
|
|||
|
Qben, Ditch the cast iron water jacketed Onan generator L mixer for a proper riser loop system prior to the plastic water trap muffler. Take a look at Sastanley's system. A vented loop is needed.
|
|
#8
IP: 76.24.202.79
04-04-2010, 10:35 PM
|
||||
|
||||
|
water backing into engine from exhaust
you have certainly identified the source of the problem. that water injection system is ridiculous. ideally the riser from the back of the manifold should rise as high as th boat configuration will allow, then turn 90 degrees aft finally 45 degrees down - only then should the water be injected. I like the Vetus waterlock next in line followed by wet hose all the way to a bronze thru pipe at the transom. Regarding size, I open the exhaust flange up to 1 1/2 npt followed by a close nipple, then a bushing up to 2 inch npt, then 2 inch (50mm) all the way to the transom. i found it necessary to raise the exhaust outlet 5 inches on the transom of my Herreschoff Bermuda 30. Do not kid yourself - get that exhaust out of your wake for sure!
Qben Oliver[/QUOTE]
|
|
#9
IP: 74.110.89.228
04-05-2010, 12:04 AM
|
||||
|
||||
|
Well, I've destroyed the mixing elbow in the picture (not malicious, just trying to get the flange off). I didn't plan to use it again anyway. My boat has a port side exhaust exit and the engine box (amidship mounted engine) fits down to within a couple of inches above the manifold flange. There is a chase on the other side of the bulkhead in front of the engine where the vented loop, blower vent tubing, and wet exhaust riser now live. That is the area I'm planning to use for the new hot/dry exhaust riser. I'll take pictures and post them as it goes together.
Thanks for all the reassurances that I'm on the right track. Qben Oliver
|
|
#10
IP: 74.110.89.228
04-05-2010, 02:24 AM
|
||||
|
||||
|
Part 3
Just to recap; The manifold is off, the hot exhaust is removed, and the broken stud has finally been removed from the manifold. I have also identified 3 broken (mangled) exhaust springs.
Since I knew I had to replace the springs, I started working on removing the head. About half of the studs came out with the nuts and I was happy to see that I had 5 or 6 threads remaining on almost all of them (there was only one with 4 threads left). I tapped and pried a bit, put nuts back on the remaining studs, knocked them back and forth a bit, and soaked them down with Kroil before going home. 36 hours later I returned and, with a bit of tapping and prying (about an hour worth), a lot more Kroil, and some heat, I got the head off. Here's what I found. The gasket (a shiny silver one) was destroyed during removal. The bottom of the head is wet with penetrating oil. 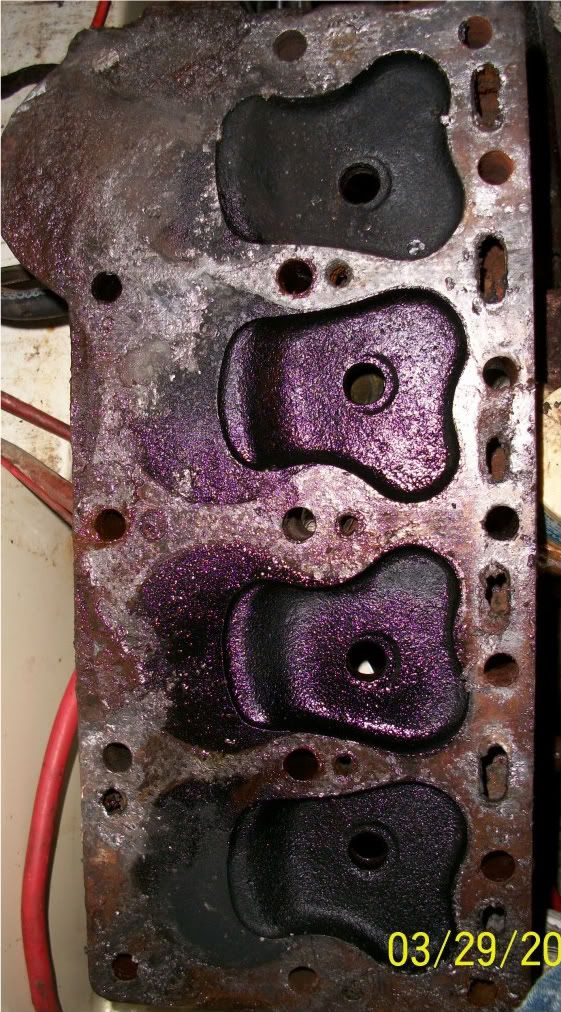 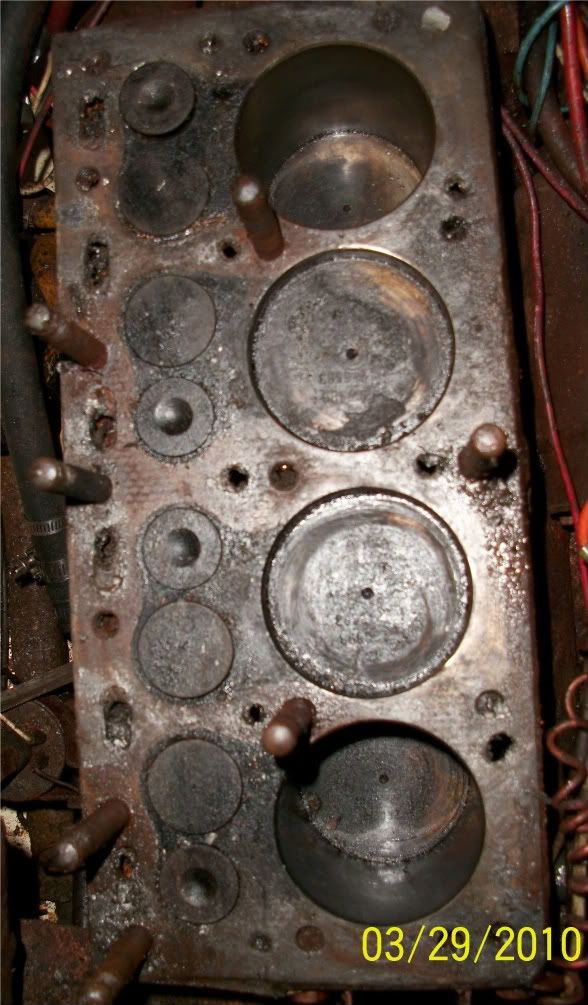 All the valves and springs came out without any trouble, but I neglected to get any pictures before they went to the machinist. I did find the #2 cylinder intake spring to also be broken, but only in one place in the bottom "loop." Since I was disassembling, and had the water jacket side of the engine uncluttered, I decided to remove the side plate. This came off without a problem and I cleaned out a fair bit of scale. I took the parts to my local machinist who advised me to replace the exhaust valves because he thought they would get to thin and be prone to burning if I ground them. Don also told me they almost always replace exhaust valves rather than refacing them, so I went ahead and ordered them. Don also told me that just trying to lap valve seats that are not in pretty good condition is futile. After a lot of calling around, apparently no machinist or mechanic has the portable valve cutting tool to reface valve seats in the boat. Strangely enough, none of them can even recall ever being asked about such a thing. This came as a surprise to me with as many A4s as it seems there must be out there and being in a pleasure boating mecca (Anacortes, WA - Gateway to the San Juan Islands). I did find an old guy at a local parts store who had a mid sixtes vintage set of grinding stones he said are the right tool for just such a job, and who claims to have the expertise to use them from a long history of grinding seats on old flathead automotive engines (VW?). He said he'd work for $50/hr (he guessed 2 hrs work), but would make a huge mess from all the finely ground bits of metal floating in the air. I'm not really excited about this when I have an open engine so I may go with Don's portable seat cutting tool after all. Change of topic - I've been trying to get the coolant temp. sending unit bushing removed from the head for weeks before all this ever started because I wanted to install the brass tee from MMI for a temp. sending unit and warning alarm sending unit. I tried many evolutions of Kroil and heat, hammering a socket to it and using a breaker bar, using a pipe wrench, etc... I have not been able to get it to move. After removing the head, I took it to one of the guys who works in the fleet maintenance shop for the municipality I work for and he said he thought he could get it out. Well, thinking he knew what he was doing better than I (apparently, I was wrong), I let him reassure me against my concerns over his plan to use an easy-out. The pictures below tell the story. Look closely at the first one. There is a crack going up and to the left at 45 degrees from the bushing. The crack in the second picture is obvious going from the crack in the bushing. It happened when he was tapping the easy-out into the bushing (not very aggressively either) and not from the turning. 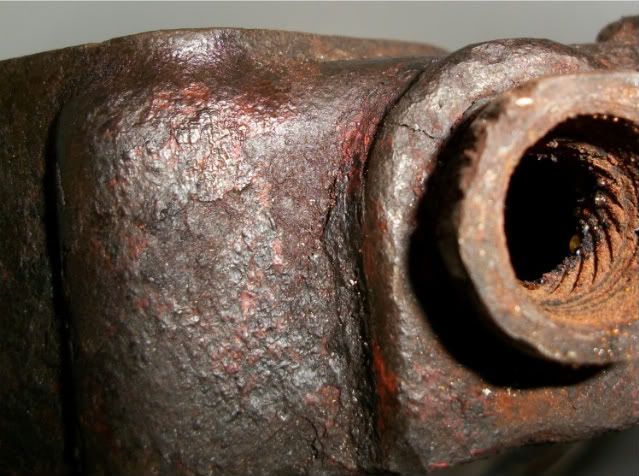 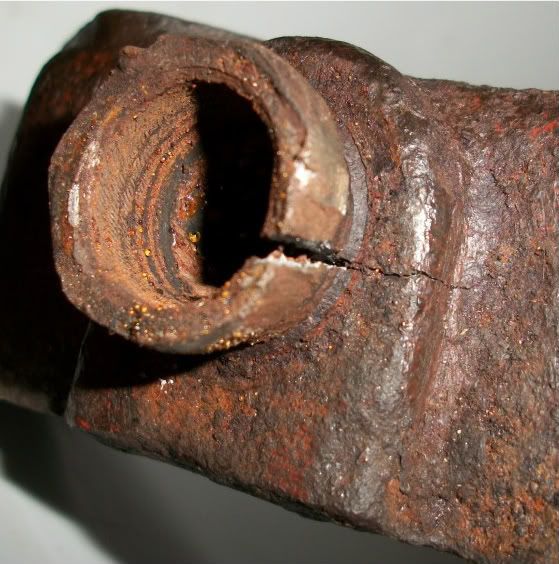 I know I can get a used head from MMI for $250, but it may be in worse shape (from corrosion) than this one, which looks pretty good to me. A new aftermarket one is $375. I've done a lot of research and found a cast iron repair specialist 40 miles away who says he would repair it for $50-$100 and guarantee the repair. This would be welded the right way with the high heat oven pre- and post-heating. He has 35 years experience with cast iron repair as his only livelihood. He is also THE source for all the well respected machinists across 3 counties. The other repair alternative is www.locknstitch.com. I talked to the owner of the company and he said they would repair it without welding for $100, but I would have to ship it to him and wait about a week to get it back. They have a pretty innovative approach that is worth reading about on their website if you have any interest. To be continued... Perhaps you are beginning to see why I named the thread "A developing story." Qben Oliver
|
|
#11
IP: 98.217.114.66
04-05-2010, 08:57 AM
|
||||
|
||||
|
the developing stoy
your story is turning into a horror show. never try to use an "easy out" which is a contradiction in terms. the correct procedure is to open the hole up gradually using incrementally larger bits and hole saws until it is possible to just re-tap. if you have been good, you will end up in the same "threads"; if not, just go a little deeper. the pictures you showed reveal a lot. i have seldom seen such plugged cooling passages in head or block. you should pull your engine and clean that block real proper. the engine has obviously been subjected to water torture for many years. your cylinder head is shot - get a new one from Moyer Marine. sorry to sound like the harbinger of bad news, but better to get it now than some day on the Delaware.
|
|
#12
IP: 74.110.89.228
04-06-2010, 01:13 AM
|
||||
|
||||
|
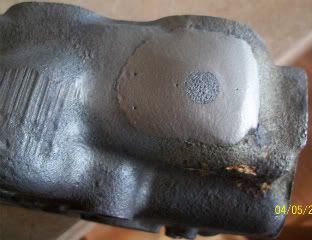
Upon picking up my parts from the machinist today, I discovered new evidence that my engine has had water backing up into the manifold for a really, really long time. After bead blasting the manifold, the repair in the picture was obvious, though totally undetectable before. The machinist assured me that the repair was done right and is probably the last part of the manifold that will fail now. The location of the repair is consistent with chronic water collection in the first exhaust port "gully" closest to the exhaust flange.
 hanleyclifford - Perhaps I will pull the whole engine and clean it in the near future, but unless I have some reason to doubt its ability to get me through the next 6 months, I have neither the time, money, or space to do it now. I'll clean the cooling passages as well as I can and then pressure flush and acid flush when it is put back together. I now know the proper procedure for removing things like that bushing. My mistake was allowing someone who works on engines for a living to allay my reservations. As for the head, I may yet buy one from Don. However, when I talked to him today he agreed that I was not likely risking a failure from the repair site if it was done right. I assessed the area under the thermostat for corrosion and it feels pretty thick. When I get the bushing out (hopefully tomorrow) I'll be able to count the threads remaining there. This is the other place Don suggested that I measure for thickness. Here are some pictures of the exhaust valves I'm replacing. 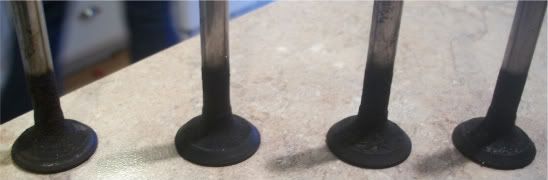 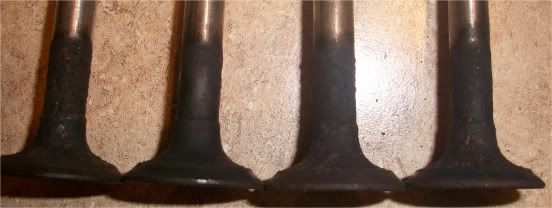 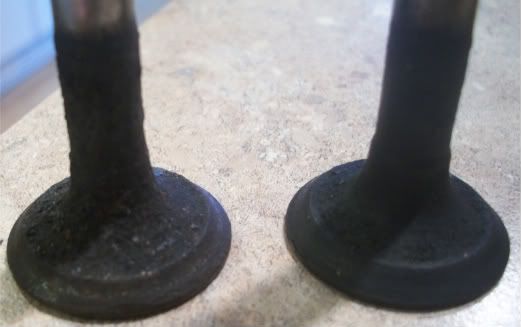 Qben Oliver
|
|
#13
IP: 142.68.250.92
04-06-2010, 05:24 AM
|
||||
|
||||
|
I wonder what's going on in the block and bottom end? I am no expert, so the debates about whether to pull an engine and tear it down always interest me. This is a case where it needs to be discussed, I think. As hanleyclifford pointed out, the cooling passages look pretty crudded up.
Although it's a bigger step, you are about halfway there. There are other advantages, like checking the engine mounts and revising if need be in an old boat.
__________________
1974 C&C 27
|
|
#14
IP: 98.217.114.66
04-06-2010, 12:44 PM
|
||||
|
||||
|
unquestionably the atomic 4 engine is an educational and humbling piece of machinery. i appreciate your efforts and those of many others to save these engines from certain oblivian. if you keep it, you will indeed pull it from the boat at some time, perhaps often. i pull my engine between trips south even if nothing is wrong because i am always getting new ideas from the Moyer organization and others which i like to incorporate. to me the boat is a mobile water born living unit with the atomic 4 at the nerve center of many systems. i have never seen a dry exhaust system on a sailboat, but the idea is intriging and would eliminate a clear and present danger to the health of the engine. keep up the good work and keep those pictures coming. i am learning how to do pictures myself, and i will be posting some myself soon.
|
|
#15
IP: 74.92.224.177
04-10-2010, 01:31 PM
|
||||
|
||||
|
Head problem solved
Well, I've solved the cracked head problem (as long as the magnaflux doesn't find anything on the "new" one). I happened across a person selling an engine with a late model head. As a bonus it had a fresh water cooling system which I wanted to put on my engine at some point anyway. Here's what $450 got me (plus everything listed in the next post):
- One complete late model engine with fresh water cooling system and all auxillary parts. It was said to be running, when removed for a repower. 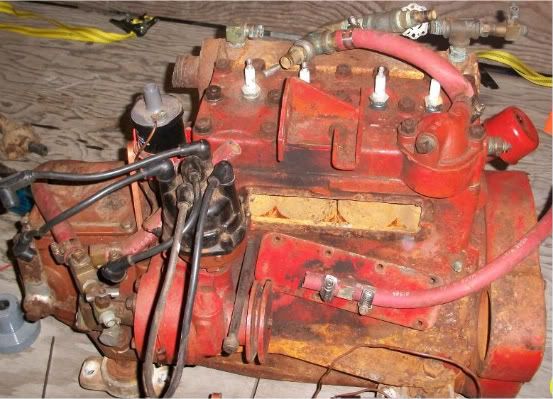 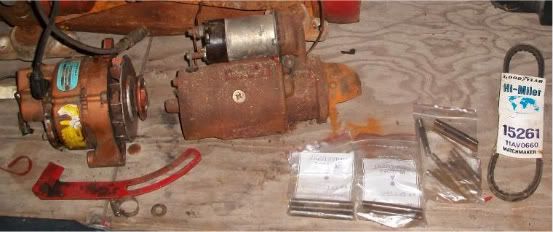 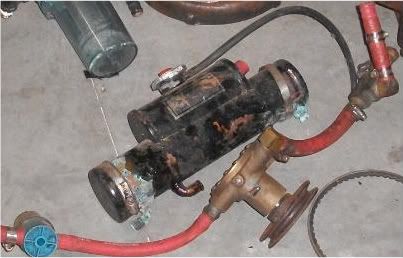 Here's a picture of the block after I removed the head. 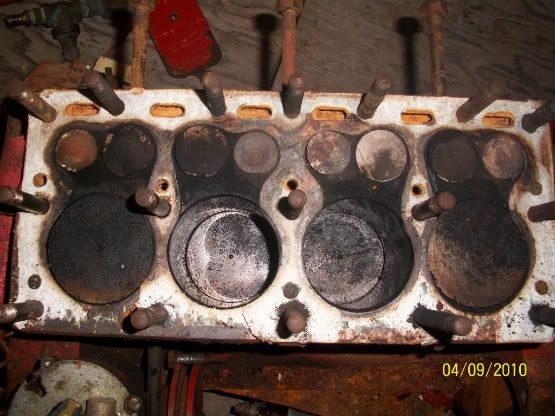 See next post for continuation (too many pictures for one post). Qben Oliver
|
|
#16
IP: 74.92.224.177
04-10-2010, 01:32 PM
|
||||
|
||||
|
Goodie box
So along with the engine, came:
- A full set of brand new head studs - 2 extra carburators - 2 extra thermostat housings (one totally uncorroded) - 3 extra Facet electric fuel pumps - 1 extra mechanical fuel pump - 1 extra accessory drive - 1 extra distributor - 1 extra water jacket side plate - 1 extra new shaft coupling - 1 air filter (is this for an Atomic 4?) - 1 bronze fitting I don't recognize an application for - 1 blue electrical something I don't recognize 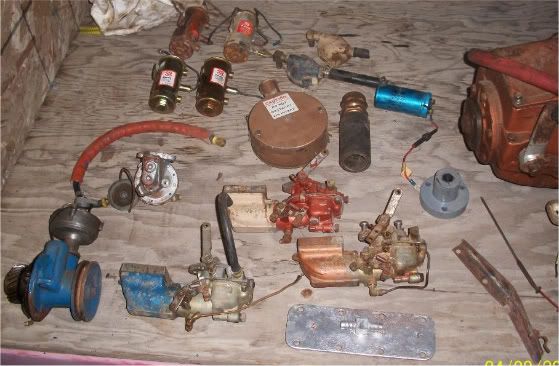 Plus: - 2 extra manifolds - 1 extra 35 amp alternator - 1 extra starter with solenoid - 1 fuel/water seperator/filter - 1 Amsoil bypass oil filter setup - 1 extra valve cover - 1 exhaust standpipe? - 1 section of water jacketed exhaust pipe 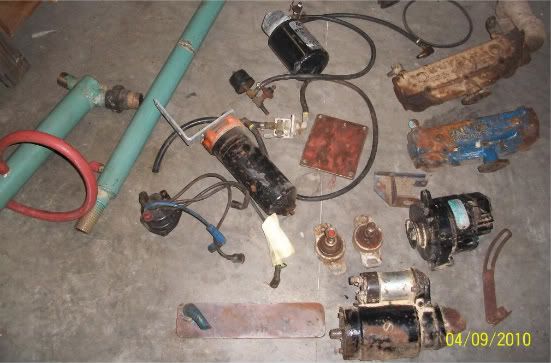 Plus: - 1 extra oil pan - 1 extra transmission and housing - 1 extra bell housing - 1 extra oil pump with filter screen - 1 raw water strainer 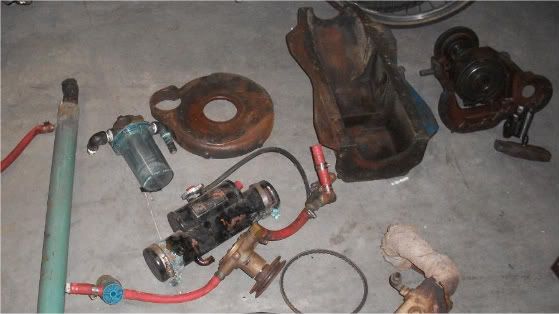 Can anyone give me any information about the parts in the picture below? 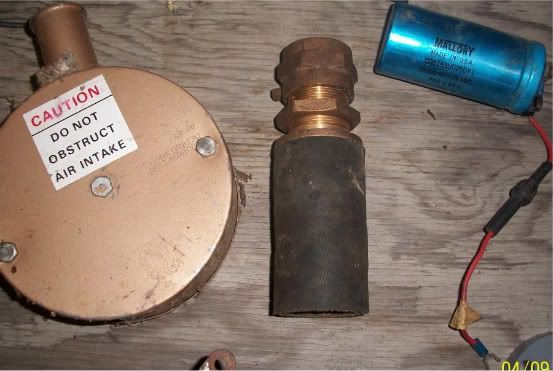 Now I have to figure out what to do with everything. Qben Oliver
|
|
#17
IP: 74.218.61.113
04-10-2010, 01:52 PM
|
||||
|
||||
|
The object on the left certainly looks like an air filter. This doesn't look like the usual filter I've seen but looks like it might fit on the carb intake. The middle item looks like a stuffing box for the prop shaft, and the blue thing looks like a capacitor. This connects to the alternator to minimize electrical noise in your radio and instruments.
I'd say you hit the jackpot-- a tinkerer's dream.
__________________
Mark Smith 1977 c&c30 Mk1 hailing from Port Clinton, Ohio Last edited by msmith10; 04-10-2010 at 01:54 PM. Reason: More info
|
|
#18
IP: 76.24.202.79
04-10-2010, 05:58 PM
|
||||
|
||||
|
amen to the jackpot. i'm drooling over the computer. how thankful we should be for the misguided souls who give up their atomic 4 and descend into the dark world of diesel. hang on to ALL of that stuff.
|
|
#19
IP: 76.106.6.207
04-10-2010, 08:40 PM
|
||||
|
||||
|
Quote:
 Wow, what a haul. I yam jellous.
|
|
#20
IP: 74.96.148.103
04-10-2010, 08:44 PM
|
|||
|
|||
|
You scored Kemosabe!
|
|
#21
IP: 74.92.224.177
04-10-2010, 09:28 PM
|
||||
|
||||
|
For some reason, my wife wasn't as enthusiastic as you guys. I'll probably keep most of it around, but unfortunately I would never have any use for 2 of the manifolds since they are "one ended" without the block off plate on the other end. The exhaust on my boat attaches on the flywheel side. That being said, I could be talked into selling:
2 manifolds 1 carburetor The mechanical fuel pump 1 or two of the electric fuel pumps The water jacketed exhaust The standpipe (maybe) A thermostat housing Keep me in mind if you ever find yourself in need. Qben Oliver
|
|
#22
IP: 71.252.31.114
04-10-2010, 10:21 PM
|
||||
|
||||
|
As others have noted, NICE HAUL!
 - your wife will get over it - your wife will get over it ") That air filter assembly looks eerily familiar to the one on my stepfather's Tartan 3000 with the M-15/5411 11HP Universal diesel. If you want to give up (or sell for a reasonable price) the accessory drive, let me know...I'd like to rebuild one with the oil passage modification for my engine.
__________________
-Shawn "Holiday" - '89 Alura 35 #109 "Twice Around" - '77 C-30, #511 with original A-4 & MMI manifold - SOLD! (no longer a two boat owner!!) 
|
|
#23
IP: 74.92.224.177
04-10-2010, 10:25 PM
|
||||
|
||||
|
Sorry Stanley, at this point I'm only willing to let go of parts that I have in excess (beyond having one for each engine and a spare). I'll keep you in mind though, if I reconsider.
Qben Oliver
|
|
#24
IP: 71.252.31.114
04-10-2010, 10:30 PM
|
||||
|
||||
|
no problem Qben...it never hurts to ask!
__________________
-Shawn "Holiday" - '89 Alura 35 #109 "Twice Around" - '77 C-30, #511 with original A-4 & MMI manifold - SOLD! (no longer a two boat owner!!)
|
 |
|
|
 Similar Threads
|
||||
| Thread | Thread Starter | Forum | Replies | Last Post |
| keel bolt story | lat 64 | General Discussion (Off-Topic) | 23 | 09-24-2011 02:38 AM |
| Fuel problems - A happy story | Concord | Fuel System | 1 | 07-09-2008 03:27 PM |
| The story of engine # 178848 so far... | Baltimore Sailor | Troubleshooting | 14 | 09-21-2007 08:51 PM |
| A carb story and question | Jim Booth | Fuel System | 1 | 05-24-2005 04:11 PM |


 Linear Mode

